|
10/15/2014 4 Comments Back to Basics: How to use a CouplerRecently on our Facebook page as part of our Tuesday Tips feature, we went back to the basics of cake decorating with a quick and easy guide to using a coupler. Here's how we did it: 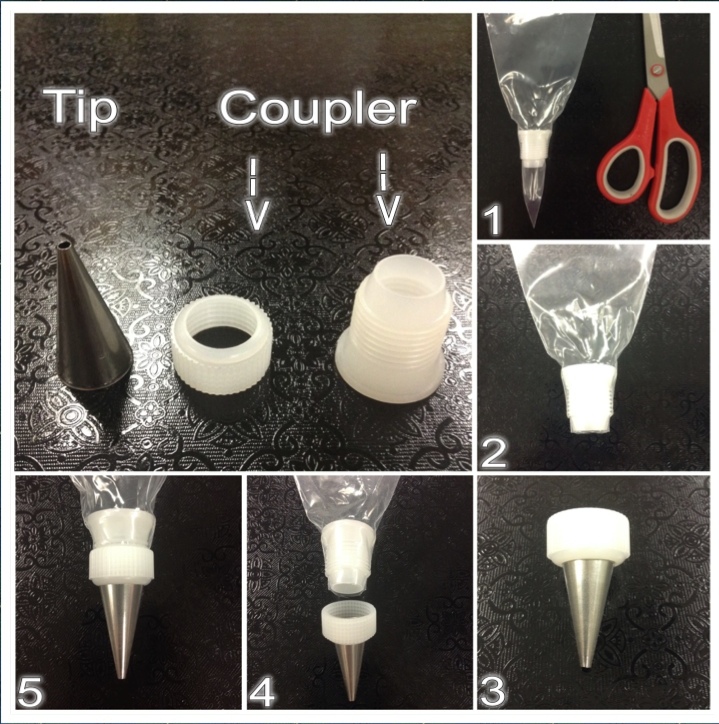
Directions
A coupler comes in two pieces: a larger tube-like piece and a smaller, thin ring piece. The ring piece is meant to screw around the tube piece, but to get started, you'll want to unscrew the coupler so that the pieces are separate. You will also need a pastry bag, a tip, and a pair of scissors. Step 1: Take the tube part of your coupler and insert it into your pastry bag, pushing it as far down as it will go as pictured in Photo #1. Step 2: Take your scissors and cut off the tip of your pastry bag so that the opening is cut flesh with the tip of your tube piece. See Photo #2. Step 3: Switching over to your other items, take your pastry tip and insert it in to the ring piece of your coupler, as shown in Photo #3. Step 4: Finally, as demonstrated in Photos #4 & #5, line up the ring piece, with tip still inserted, at the opening of your pastry bag and screw it in place on the tube-like piece of your coupler. You have now successfully put together a coupler and are ready to pipe away! Bonus Tip: Did you know that you don't always need a coupler? That's right! The main point of a coupler is to allow you to switch tips on the same pastry bag while working. If, however, you only need to use the same tip the entire you're working with your pastry bag, you won't need to use a coupler. Simply insert the tip into your pastry bag, cut the tip of the bag off, fill with frosting, and set to work!
4 Comments
|
Kilted Blog
Here is where we like to share our knowledge and love of decorating with you! Keep checking to see what's new, recipes, decorating ideas, and more. Archives
July 2018
Categories |
 RSS Feed